-
Configuring a device running Windows 10
Right click the Start Menu button and select Control Panel – Network and Sharing Centre – Setup a new connection or network
Select Manually connect to a wireless network and click next
- Enter the SSID (Network Name) is eduroam (note that this is case-sensitive).
- The wireless Network Authentication type should be set to WPA2 Enterprise.
- The Data Encryption method to use is AES.
- Click Next
- Click Change connection settings and click the Security tab
- Ensure the Network Authentication Method is set to PEAP
- Click Settings:
- Untick Validate Server Certificate
- Under Select Authentication Method Confirm EAP-MSCHAPv2 is selected then click Configure and untick Automatically use my Windows logon name and password (and domain if any)
- Then OK, OK
- Select advanced settings and on the 802.1x settings tab tick specify authentication mode and select user authentication then OK, OK and Close.
- Now go to your wireless and you will either be prompted for username and password or you'll need to select eduroam where you will get prompted for username and password.
- If settings are put in incorrectly you'll need to manually delete eduroam
- Click on the wireless icon on the task bar, near the bottom click Network Settings then scroll down the window and choose WiFi settings, scroll down again and under Manage known networks select eduroam and click forget, then you'll need to start through the guide again to add it back in.
-
Configuring a device running Windows 7
You need to go to Control Panel – Network and Sharing Centre – Manage Wireless Networks – Add – Manually Create a Network Profile
- Configuring your wireless network settings:
- The SSID (Network Name) is eduroam (note that this is case-sensitive).
- The wireless Network Authentication type is WPA2 Enterprise.
- The Data Encryption method to use is AES.
- Ensure the Network Authentication Method is set to PEAP
- Click Settings
- Tick Validate Server Certificate
- Tick Connect to these servers. Set this to be securelogin.arubanetworks.com
- Ensure Do not prompt user to authorise new servers or trusted certificate authorities is ticked
- Click Configure and untick Automatically use my Windows logon name and password (and domain if any)
Logging in to Eduroam
Your Username and Password will be your college credentials (charnwood\student number or epinal\staff username)
- o If you are not a staff member or student of Loughborough College, the Username is your organisation followed by @your organisations Eduroam Identifier.
- o The Password is your password for your account at your organisation.
If you have trouble following these settings, the IT Support Helpdesk may be able to help configure your device. However please note that not all devices can use eduroam; if you find this is the case, Loucoll-BYOD may be used instead.
Troubleshooting
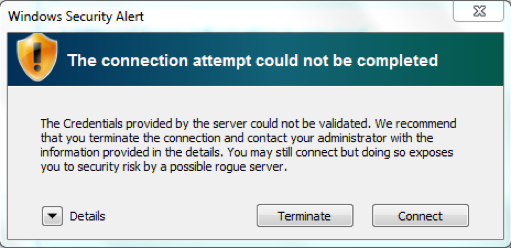
If you see this message, this is not a cause for concern, click the connect button, enter your username and password. Click Ok, then click Connect again to the same message again.
To stop this from happening, follow the guide about configuring a device for Windows 7.
Note: When following the guide, be sure to right click on the existing eduroam profile rather than create a new one.
No network connection even after typing your user credentials
Eduroam will normally give you multiple attempts to get your username and password correct. However, if you get it wrong too many times then it will stop prompting you for your credentials.
Should this happen, select the eduroam wireless from the list of available networks and try again. Please note, if you are college staff or student, and you get your credentials wrong too many times there is a chance of you locking your account out. If this happens, you won’t be able to use it for 15 minutes, by that time it will have automatically unlocked itself again. The IT Support Helpdesk can also unlock staff and student accounts.
If you are unsure about your credentials for eduroam, please refer to Logging into Eduroam
![]()